Android Tutorial
Android Widgets
- UI Widgets
- Android Button
- Android Toast
- Android Custom Toast
- Android ToggleButton
- Android CheckBox
- Android Custom CheckBox
- Android RadioButton
- Android Dynamic RadioButton
- Custom RadioButton
- AlertDialog
- Spinner
- Auto Complete Text View
- ListView
- Custom ListView
- RatingBar
- WebView
- SeekBar
- DatePicker
- TimePicker
- Analog clock and Digital clock
- ProgressBar
- ScrollView Vertical
- HorizontalScrollView
- Image Switcher
- Image Slider
- ViewStub
- TabLayout
- TabLayout with FrameLayout
- SearchView
- SearchView on ToolBar
- EditText with TextWatcher
Activity and Intents
Android Fragments
Android Menu
Android Service
Android AlarmManager
Android Storage
Android SQLite
XML and JSON
Android Multimedia
Android Speech
Android Telephony
Android Device
Camera Tutorial
Sensor Tutorial
Android Graphics
Android Animation
Android Web Service
Android Examples
- QR Code / Bar Code Scanner
- RSS Feed Reader
- Volley Library Fetching JSON Data from URL
- Linkify Example
- Introduction Slider (Launch very first time when app start)
- RecyclerView List
- Swipe to Delete RecyclerView items with UNDU
- Swipe to refresh Android Activity
- Volley Library - Registration, Log-in, and Log-out
- Network Connectivity Services
- Firebase Authentication - Google Login
- Android Notification
- Using Google reCAPTCHA in Android Application
Android Social
Android Versions
Android Misc
- Android Device Manager
- Android Studio
- Android Auto
- Android to Mac
- Android Messages
- Android TV
- Android Screenshot
- Android Pay
- Android Watch
- Android Phones
- Android Tablet
- Android Find My Phone
- Android One
- Android Wear OS
- Android Data Recovery
- Android Antivirus
- Android x86
- Android Emulator for PC
- Android File Manager
- Android ad blocker
- Android Podcast App
- Fortnite Android an Epic Game
- FaceTime on Android
- ShowBox for Android
- Android App Store
- Virus Removal for Android
- cache in Android
- Root Android Device
- Android Screen Recorder
- block a number
- Canon printer app
- Wireless HP printer app
- How to Update Android
- iMessage for Android
- iCloud for Android
- Best Call Recorder
- Videoder Android
- YouTube Video Downloader
- Airdrop for Android
- RoboKiller for Android
- Clean my Android Phone
- How to hide apps, files, and photos on Android
- Best weather apps with widgets for Android
- Android File Transfer for Mac
- Mobdro for Android
- Screen Mirroring in Android
- Stock market apps for Android
- How to turn On or Off safe mode on Android
- Best browsers for Android
- Best clocks for Android
- Best email apps for Android
- Music player for Android
- Android smartwatch for women
- Best keyboard for Android
- Best messaging app for Android
Android MCQ
Android Interview
Android Quiz
Android Emulator
The Android emulator is an Android Virtual Device (AVD), which represents a specific Android device. We can use the Android emulator as a target device to execute and test our Android application on our PC. The Android emulator provides almost all the functionality of a real device. We can get the incoming phone calls and text messages. It also gives the location of the device and simulates different network speeds. Android emulator simulates rotation and other hardware sensors. It accesses the Google Play store, and much more
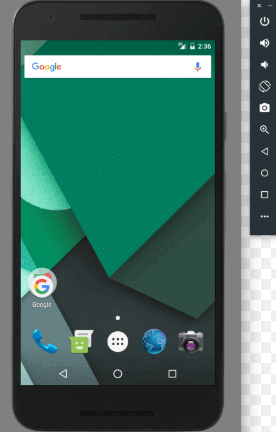
Testing Android applications on emulator are sometimes faster and easier than doing on a real device. For example, we can transfer data faster to the emulator than to a real device connected through USB.
The Android emulator comes with predefined configurations for several Android phones, Wear OS, tablet, Android TV devices.
Requirement and recommendations
The Android emulator takes additional requirements beyond the basic system requirement for Android Studio. These requirements are given below:
PauseNext
Unmute
Current Time 1:25
/
Duration 18:10
Loaded: 13.58%
Â
Fullscreen
- SDK Tools 26.1.1 or higher
- 64-bit processor
- Windows: CPU with UG (unrestricted guest) support
- HAXM 6.2.1 or later (recommended HAXM 7.2.0 or later)
Install the emulator
The Android emulator is installed while installing the Android Studio. However some components of emulator may or may not be installed while installing Android Studio. To install the emulator component, select the Android Emulator component in the SDK Tools tab of the SDK Manager.
Run an Android app on the Emulator
We can run an Android app form the Android Studio project, or we can run an app which is installed on the Android Emulator as we run any app on a device.
To start the Android Emulator and run an application in our project:
1. In Android Studio, we need to create an Android Virtual Device (AVD) that the emulator can use to install and run your app. To create a new AVD:-
1.1 Open the AVD Manager by clicking Tools > AVD Manager.
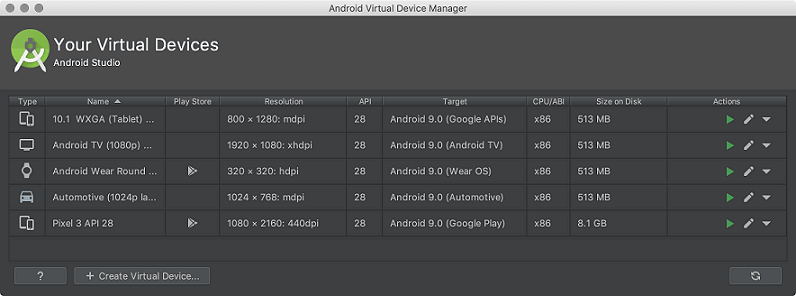
1.2 Click on Create Virtual Device, at the bottom of the AVD Manager dialog. Then Select Hardware page appears.
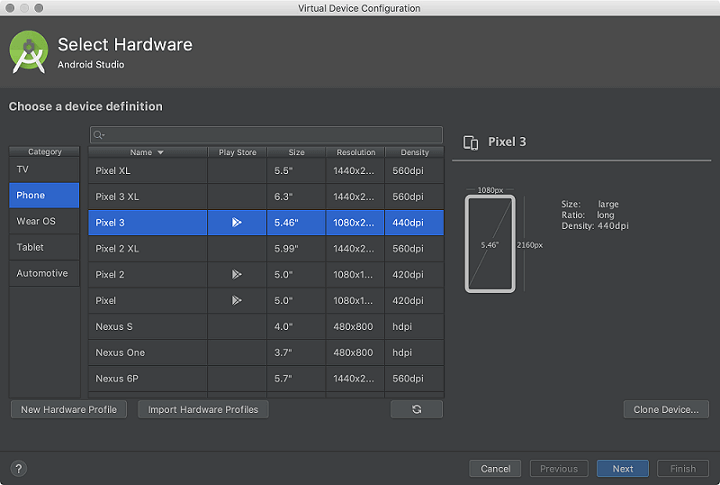
1.3 Select a hardware profile and then click Next. If we don?t see the hardware profile we want, then we can create or import a hardware profile. The System Image page appears.
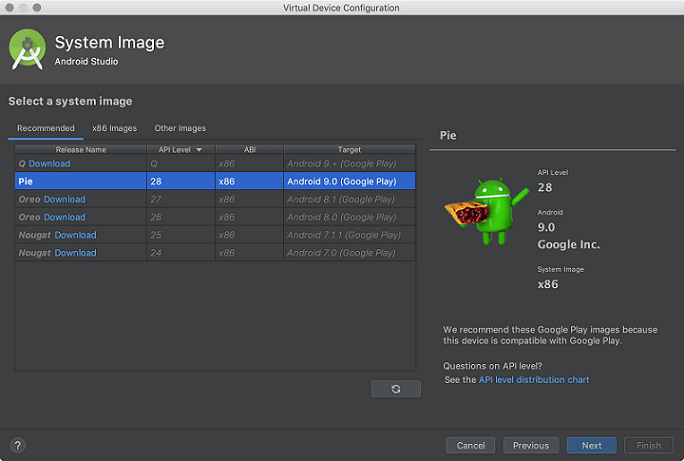
1.4 Select the system image for the particular API level and click Next. This leads to open a Verify Configuration page.
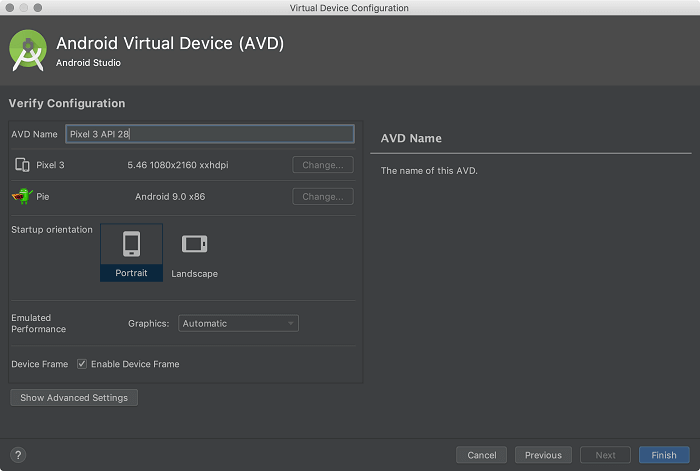
1.5 Change AVD properties if needed, and then click Finish.
2. In the toolbar, choose the AVD, which we want to run our app from the target device from the drop-down menu.
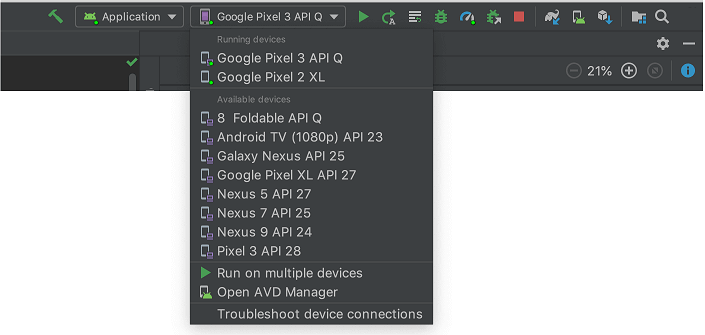
3. Click Run.
Launch the Emulator without first running an app
To start the emulator:
- Open the AVD Manager.
- Double-click an AVD, or click Run
While the emulator is running, we can run the Android Studio project and select the emulator as the target device. We can also drag an APKs file to install on an emulator, and then run them.
Start the emulator from the command line
The Android SDK includes the Android device emulator. Android emulator lets you develop and test out the application without using a physical device.
Starting the emulator
Using the emulator command, we will start an emulator. It is an alternative to run our project or start through the AVD Manager.
Here is the basic command-line syntax for starting a virtual device:
or
For example, if we execute the emulator from Android Studio on a Mac, the default command line will be similar as follows:
To display the list of AVD names, enter the following command:
Run and stop an emulator, and clear data
From the Virtual Device page, we can perform the following operation on emTo run an Android emulator that uses an AVD, double-click the AVD, or click Launch
- To stop the running emulator, right-click and select Stop, or click Menu ▼ and select Stop.
- If we want to clear the data from an emulator and return it to the initial state when it was first defined, then right-click an AVD and select Wipe Data. Or click menu ▼ and select Wipe Data.


