React Native Tutorial
- React Native Tutorial
- React Native Environment Setups
- React Native First Application Hello World
- React Native View
- React Native State
- React Native Props
- React Native Style
- React Native Height and Width
- React Native Button
- React Native Layout and Flexbox
- React Native Positioning Element with Flex
- React Native ScrollView
- React Native ListView
- React Native FlatList
- React Native SectionList
- React Native Touchables
- React Native Text Input
- React Native ActivityIndicator
- React Native Picker
- React Native StatusBar
- React Native Switch
- React Native WebView
- React Native ProgressBarAndroid
- React Native ProgressBar With Animated
Navigation
- React Native Navigation
- React Native Configuring Header Bar
- React Native Moving Between Screens
- React Native Passing Value between Screen
- React Native Tab Navigation
- React Native Adding Icons at the Bottom of Tab Navigation
- React Native Create Material Bottom Tab Navigator
- React Native Top Tab Navigator
- React Native Drawer Navigation
Storage
React Misc
- React Native Google Map
- React Native Modal
- React Native Vector Icons
- React Native Splash Screen
- React Native vs. Ionic
- React Native vs. Xamarin
- React Native vs Flutter
- React Native vs React
- React Native vs Swift
- Box shadow in React Native
- React Native IAP
- React-Native Localization
- React Native Toast
- React Native Sound
React Native State
There are two types of data state and props in React Native which control the component. The component that uses the state is mutable. They can be changed later on if required. The props component is immutable, and it is fixed throughout the lifetime.
The state is generally initialized in constructor and then call setState when we want to change it.
React Native state Example 1
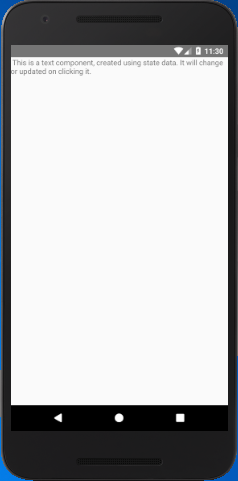
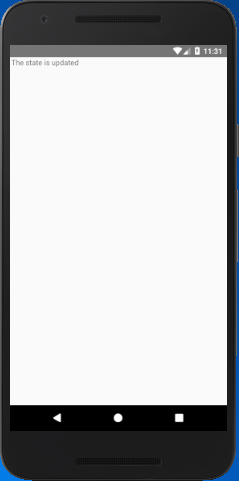
In this example, we create a Text component with state data. The content of Text component will be updated by clicking on it. The event onPress call the setState, and it updates the state "myState" text.
import { Text, View } from 'react-native';
export default class App extends Component {
state = {
myState: 'This is a text component, created using state data. It will change or updated on clicking it.'
}
updateState = () => this.setState({myState: 'The state is updated'})
render() {
return (
<View>
<Text onPress={this.updateState}> {this.state.myState} </Text>
</View>
);
}
}
Output


React Native state Example 2
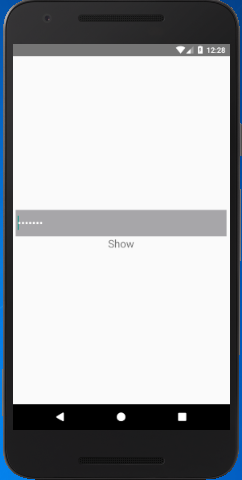
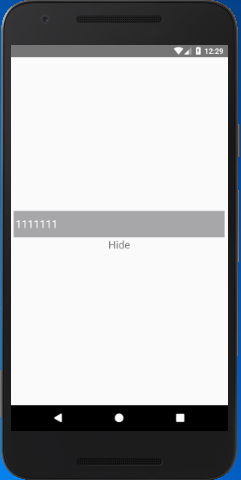
Let's create another example of state data in which we interchange the Text value "Show" and "Hide" to show and hide the input password.
Create three state variables that will be changed by clicking the Text component defined as a state. Clicking the Text component calls the handleToggle function, and the current state of Boolean variable "isPasswordVisible" is assigned in it. Here, if the condition checks the value of "isPasswordVisible" and proceeds accordingly.
import {StyleSheet,Text,View,TextInput,TouchableOpacity} from 'react-native';
export default class App extends Component {
state: {
password: string,
isPasswordVisible: boolean,
toggleText: string,
}
constructor(props: Props) {
super(props);
this.state = {
password: '',
isPasswordVisible: true,
toggleText: 'Show',
};
}
handleToggle = () => {
const { isPasswordVisible } = this.state;
if (isPasswordVisible) {
this.setState({ isPasswordVisible: false });
this.setState({ toggleText: 'Hide' });
} else {
this.setState({ isPasswordVisible: true });
this.setState({ toggleText: 'Show' });
}
};
render() {
return (
<View style={styles.container}>
<TextInput
secureTextEntry={this.state.isPasswordVisible}
style={{ width: 400, height: 50, backgroundColor: '#a7a6a9', color: 'white', fontSize: 20 }}
/>
<TouchableOpacity onPress={this.handleToggle}>
<Text style={{fontSize: 20}}>{this.state.toggleText}</Text>
</TouchableOpacity>
</View>
);
}
}
const styles = StyleSheet.create({
container: {
flex: 1,
justifyContent: 'center',
alignItems: 'center',
}
});
Output


