React Native Tutorial
- React Native Tutorial
- React Native Environment Setups
- React Native First Application Hello World
- React Native View
- React Native State
- React Native Props
- React Native Style
- React Native Height and Width
- React Native Button
- React Native Layout and Flexbox
- React Native Positioning Element with Flex
- React Native ScrollView
- React Native ListView
- React Native FlatList
- React Native SectionList
- React Native Touchables
- React Native Text Input
- React Native ActivityIndicator
- React Native Picker
- React Native StatusBar
- React Native Switch
- React Native WebView
- React Native ProgressBarAndroid
- React Native ProgressBar With Animated
Navigation
- React Native Navigation
- React Native Configuring Header Bar
- React Native Moving Between Screens
- React Native Passing Value between Screen
- React Native Tab Navigation
- React Native Adding Icons at the Bottom of Tab Navigation
- React Native Create Material Bottom Tab Navigator
- React Native Top Tab Navigator
- React Native Drawer Navigation
Storage
React Misc
- React Native Google Map
- React Native Modal
- React Native Vector Icons
- React Native Splash Screen
- React Native vs. Ionic
- React Native vs. Xamarin
- React Native vs Flutter
- React Native vs React
- React Native vs Swift
- Box shadow in React Native
- React Native IAP
- React-Native Localization
- React Native Toast
- React Native Sound
Linking and Using Third Party Libraries
The third party Library provides the native app features which are not available in React Native features. If we refer to React Native documentation, there are lots of features that are not available (such as maps). Due to this, we need to add third party libraries in our project. In this tutorial, we would learn how to add the third parties libraries in our app (adding third party icons). There are different sets of bundled Icon available. Some of them are listed below:
- AntDesign
- Entypo
- EvilIcons
- Feather
- FontAwesome
- FontAwesome 5
- Foundation
- Ionicons
- MaterialIcons
- MaterialCommunityIcons
- Octicons
- Zocial
- SimpleLineIcons
Installing Libraries
There are different ways and commands to install the libraries depending upon the development OS and target OS. In this tutorial, we install the Ionicons libraries. To install the Ionicons libraries on Windows, run the command: $ npm install react-native-vector-icons --save.
Create a project and run 'npm install --save react-native-vector-icons' as D:\ReactNative\navigationApp>npm install --save react-native-vector-icons
Linking Libraries on Android
Open your android/settings.gradle file and add the below code. Here, we are adding only Ionicons library. If you want to add others libraries, just add them in include tag and mention their path and library in android folder at project as below.
project(':react-native-vector-icons').projectDir = new File(rootProject.projectDir, '../node_modules/react-native-vector-icons/android')
Now, add the following dependency in android/app/build.gradle:
Earlier, upto 2018 the compile term is used in place of implementation.
In, android/app/src/main/java/com/{project_directory}/MainApplication.java
...
@Override
protected List<ReactPackage> getPackages() {
return Arrays.<ReactPackage>asList(
new MainReactPackage(),
new VectorIconsPackage()
);
}
To add more libraries, simply separate them with comma and add libraries packages. The above procedures are common to add native libraries in the Android.
Now, in 'android/app/build.gradle' add the following dependency:
iconFontNames: ['Ionicons.ttf'] // Name of the font files you want to copy
]
React Native Linking Third Party Library Example
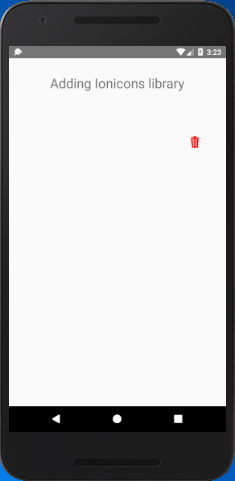
In this example, we will add the trash icon of the Ionicons library. Open your project, and import Icon from 'react-native-vector-icons/Ionicons' package. Search for icon at ionicons.com which you want to add (in my case ios-trash).
In the npm doc, you will find the Icon Component and its properties.
App.js
import {Platform, StyleSheet, Text, View, TouchableOpacity,Alert} from 'react-native';
import Icon from 'react-native-vector-icons/Ionicons';
type Props = {};
export default class App extends Component<Props> {
deleteItem = ()=>{
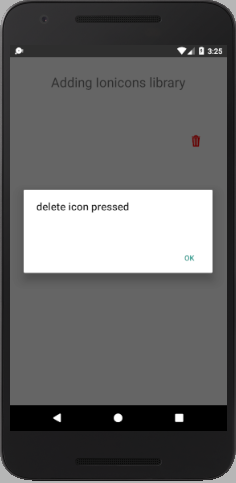
Alert.alert("delete icon pressed")
}
render() {
return (
<View style={styles.container}>
<Text style={styles.textStyle}>Adding Ionicons library</Text>
<TouchableOpacity style={styles.touchableStyle} onPress= {this.deleteItem} >
<Icon size={30} name="ios-trash" color="red"/>
</TouchableOpacity>
</View>
);
}
}
const styles = StyleSheet.create({
container: {
flex: 1,
},
textStyle:{
fontSize:25,
marginTop: 30,
textAlign: 'center',
},
touchableStyle:{
marginTop: 80,
justifyContent: 'center',
alignItems: "flex-end",
marginRight: 50,
}
});
Output:


