Flutter Tutorial
Dart Programming
Flutter Basics
Flutter Widgets
- Flutter Scaffold
- Flutter Container
- Flutter Row and Column
- Flutter Text
- Flutter TextField
- Flutter Buttons
- Flutter Stack
- Flutter Forms
- Flutter Alert Dialogs
- Flutter Icons
- Flutter Images
- Flutter Card
- Flutter Tabbar
- Flutter Drawer
- Flutter Lists
- Flutter GridView
- Flutter Toast Notification
- Flutter Checkbox
- Flutter Radio Button
- Flutter Progress Bar
- Flutter Snackbar
- Flutter Tooltip
- Flutter Slider
- Flutter Switch
- Flutter Charts
- Flutter Bottom Navigation Bar
- Flutter Themes
- Flutter Table
- Flutter Calendar
- Flutter Animation
Flutter Routing
Advanced Concepts
Flutter Differences
Flutter Interview Questions
Flutter Gestures
Gestures are an interesting feature in Flutter that allows us to interact with the mobile app (or any touch-based device). Generally, gestures define any physical action or movement of a user in the intention of specific control of the mobile device. Some of the examples of gestures are:
- When the mobile screen is locked, you slide your finger across the screen to unlock it.
- Tapping a button on your mobile screen, and
- Tapping and holding an app icon on a touch-based device to drag it across screens.
We use all these gestures in everyday life to interact with your phone or touch-based device.
Flutter divides the gesture system into two different layers, which are given below:
- Pointers
- Gestures
Pointers
Pointers are the first layer that represents the raw data about user interaction. It has events, which describe the location and movement of pointers such as touches, mice, and style across the screens. Flutter does not provide any mechanism to cancel or stop the pointer-events from being dispatched further. Flutter provides a Listener widget to listen to the pointer-events directly from the widgets layer. The pointer-events are categories into mainly four types:
ADVERTISEMENT
ADVERTISEMENT
- PointerDownEvents
- PointerMoveEvents
- PointerUpEvents
- PointerCancelEvents
PointerDownEvents: It allows the pointer to contact the screen at a particular location.
PointerMoveEvents: It allows the pointer to move from one location to another location on the screen.
PointerUpEvents: It allows the pointer to stop contacting the screen.
PointerCancelEvents: This event is sent when the pointer interaction is canceled.
Gestures
It is the second layer that represents semantic actions such as tap, drag, and scale, which are recognized from multiple individual pointer events. It is also able to dispatch multiple events corresponding to gesture lifecycle like drag start, drag update, and drag end. Some of the popularly used gesture are listed below:
Tap: It means touching the surface of the screen from the fingertip for a short time and then releasing them. This gesture contains the following events:
- onTapDown
- onTapUp
- onTap
- onTapCancel
Double Tap: It is similar to a Tap gesture, but you need to tapping twice in a short time. This gesture contains the following events:
- onDoubleTap
Drag: It allows us to touch the surface of the screen with a fingertip and move it from one location to another location and then releasing them. Flutter categories the drag into two types:
- Horizontal Drag: This gesture allows the pointer to move in a horizontal direction. It contains the following events:
- onHorizontalDragStart
- onHorizontalDragUpdate
- onHorizontalDragEnd
- Vertical Drag: This gesture allows the pointer to move in a vertical direction. It contains the following events:
- onVerticalDragStart
- onVerticalDragStart
- onVerticalDragStart
Long Press: It means touching the surface of the screen at a particular location for a long time. This gesture contains the following events:
- onLongPress
Pan: It means touching the surface of the screen with a fingertip, which can move in any direction without releasing the fingertip. This gesture contains the following events:
- onPanStart
- onPanUpdate
- onPanEnd
Pinch: It means pinching (move one's finger and thumb or bring them together on a touchscreen) the surface of the screen using two fingers to zoom into or out of a screen.
Gesture Detector
Flutter provides a widget that gives excellent support for all types of gestures by using the GestureDetector widget. The GestureWidget is non-visual widgets, which is primarily used for detecting the user's gesture. The basic idea of the gesture detector is a stateless widget that contains parameters in its constructor for different touch events.
In some situations, there might be multiple gesture detectors at a particular location on the screen, and then the framework disambiguates which gesture should be called. The GestureDetector widget decides which gesture is going to recognize based on which of its callbacks are non-null.
Let us learn how we can use these gestures in our application with a simple onTap() event and determine how the GestureDetector processes this. Here, we are going to create a box widget, design it according to our desired specification, and then add the onTap() function to it.
Now, create a new Flutter project and replace the following code in main.dart file.
void main() => runApp(MyApp());
class MyApp extends StatelessWidget {
// This widget is the root of your application.
@override
Widget build(BuildContext context) {
return MaterialApp(
title: 'Flutter Demo Application', theme: ThemeData(
primarySwatch: Colors.green,),
home: MyHomePage(),
);
}
}
class MyHomePage extends StatefulWidget {
@override
MyHomePageState createState() => new MyHomePageState();
}
class MyHomePageState extends State {
@override
Widget build(BuildContext context) {
return new Scaffold(
appBar: new AppBar(
title: new Text('Gestures Example'),
centerTitle: true,
),
body: new Center(child: GestureDetector(
onTap: () {
print('Box Clicked');
},
child: Container(
height: 60.0,
width: 120.0,
padding: EdgeInsets.all(10.0),
decoration: BoxDecoration(
color: Colors.blueGrey,
borderRadius: BorderRadius.circular(15.0),
),
child: Center(child: Text('Click Me')),
)
)),
);
}
Output
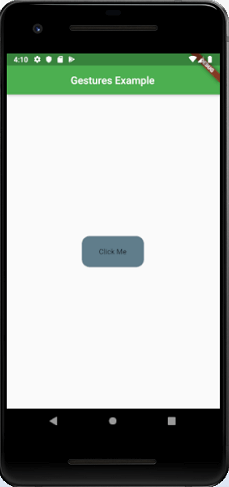
When you run this dart file in Android Studio, it will give the following output in the emulator.

In the above image, you can see a button with rounded edges on the center of the screen. When you tap on this, it behaves like a button, and the output can be seen in the console.
Flutter also provides a set of widgets that can allow you to do a specific as well as advanced gestures. These widgets are given below:
Dismissible: It is a type of widget that supports the flick gesture to dismiss the widget.
Draggable: It is a type of widget that supports drag gestures to move the widget.
LongPressDraggable: It is a type of widget that supports drag gesture to move a widget along with its parent widget.
DragTarget: It is a type of widget that can accept any Draggable widget
IgnorePointer: It is a type of widget that hides the widget and its children from the gesture detection process.
AbsorbPointer: It is a type of widget that stops the gesture detection process itself. Due to this, any overlapping widget cannot able to participate in the gesture detection process, and thus, no event is raised.
Scrollable: It is a type of widget that supports scrolling of the content which is available inside the widget.
Multiple Gesture Example
In this section, we are going to see how multiple gestures work in flutter applications. This demo app consists of two containers parent and child. Here, everything is handled manually by using 'RawGestureDetector' and a custom 'GestureRecognizer' The custom GestureRecognizer provide 'AllowMultipleGestureRecognizer' property to the gesture list and creates a 'GestureRecognizerFactoryWithHandlers'. Next, when the onTap() event is called, it prints text to the console.
Open the flutter project and replace the following code in the main.dart file,
import 'package:flutter/material.dart';
//It is the entry point for your Flutter app.
void main() {
runApp(
MaterialApp(
title: 'Multiple Gestures Demo',
home: Scaffold(
appBar: AppBar(
title: Text('Multiple Gestures Demo'),
),
body: DemoApp(),
),
),
);
}
class DemoApp extends StatelessWidget {
@override
Widget build(BuildContext context) {
return RawGestureDetector(
gestures: {
AllowMultipleGestureRecognizer: GestureRecognizerFactoryWithHandlers<
AllowMultipleGestureRecognizer>(
() => AllowMultipleGestureRecognizer(),
(AllowMultipleGestureRecognizer instance) {
instance.onTap = () => print('It is the parent container gesture');
},
)
},
behavior: HitTestBehavior.opaque,
//Parent Container
child: Container(
color: Colors.green,
child: Center(
//Now, wraps the second container in RawGestureDetector
child: RawGestureDetector(
gestures: {
AllowMultipleGestureRecognizer:
GestureRecognizerFactoryWithHandlers<
AllowMultipleGestureRecognizer>(
() => AllowMultipleGestureRecognizer(), //constructor
(AllowMultipleGestureRecognizer instance) { //initializer
instance.onTap = () => print('It is the nested container');
},
)
},
//Creates the nested container within the first.
child: Container(
color: Colors.deepOrange,
width: 250.0,
height: 350.0,
),
),
),
),
);
}
}
class AllowMultipleGestureRecognizer extends TapGestureRecognizer {
@override
void rejectGesture(int pointer) {
acceptGesture(pointer);
}
}
Output
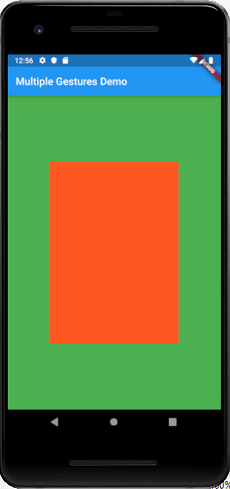
When you run the app, it will give the following output.

Next, tap on the orange box, the following output appears on your console.
It is the nested container.
It is the parent container gesture.


